What is ShadowMagic?
A brand new way to visualize lighting, scenery and color. It works on an iPhone or iPad.
Lights, Color, Scenery, and Actors... in your pocket
Have you ever wanted a Black Box Theatre or a light lab that was available anytime just to you? Now you an have one and carry it around with you. So whether you are in lighting design class or planning a photo shoot or on a plane to you next gig your can experiment, visualize and play to your heart's content.
But ShadowMagic is more than just a playground. Using our project and scene method of cataloging your ideas, you can build a complete sketchbook of a show to collaborate with others involved with your production. It can be easily shared as a file and sent to a colleague across the room or across the world. They can view it on their iPad or iPhone just as you imagined. Or you can print a .pdf report if you need a hard copy.
- Choose 1 of 4 actors, Rick, Cindy, Luigi, or Barb.
- 8 luminaires, each can be either a spot or wash light.
- Source Four® with 5 different lenses.
- Over 1,600 Colors from the 4 major manufacturers.
- A 40' x 30' stage.
- A 40' x 20' Cyclorama.
What can you do with ShadowMagic?
Anytime you wonder "what would this look like?", ShadowMagic can provide the answer. Quickly and accurately so you know that your vision can work in real life.
Look at your scene from any angle
Look at your scene from the back of the house or backstage. Get close enough to count the hairs on the actor's arm. All this is possible with ShadowMagic.
- 1 finger swipe left/right or up/down rotates or tilts the scene.
- 2 finger swipe left/right, or up/down: pans the scene.
- 3 finger swipe up or down: dolly the viewpoint in or out.
If you rotate the scene around to the back of the scrim, you can then dolly the viewpoint in and end up behind the actor but in front of the scrim. The scrim is semi-transparent so when you are behind the cyc you can see through to the stage and any colors on the cyc.
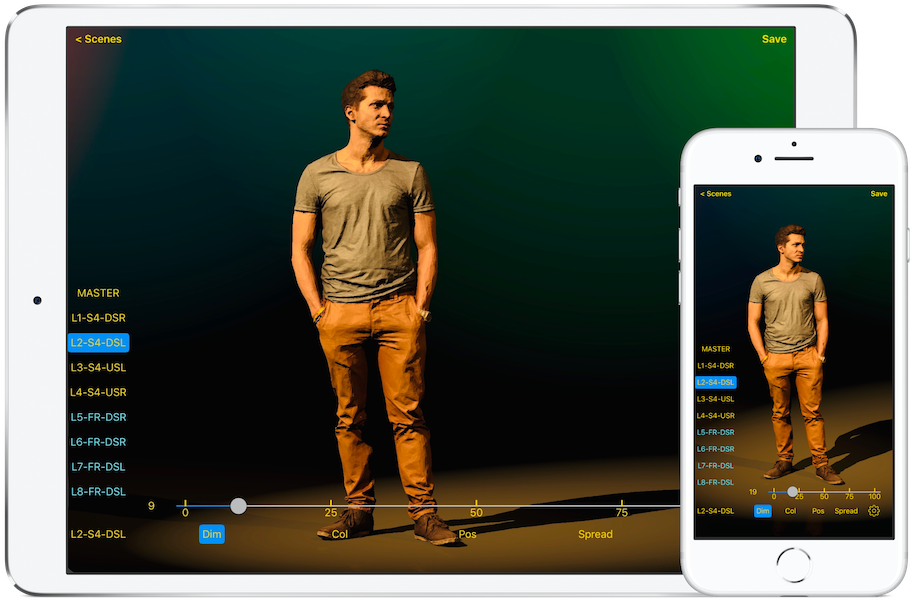
Be picky with your Lighting Levels
Intensity is important and can be set with each individual light or the entire scene can be adjusted with a grand master. All the dimmer adjustments are in 1% increments for subtle changes.
Our initial offerings for lighting fixtures are incandescent. As the light is dimmed, the color temperature is decreased from 3200° K at full to 2300° when the light is at 4% intensity. This color shift allows you to evaluate colors on the actor very realistically.
Choose your Lights
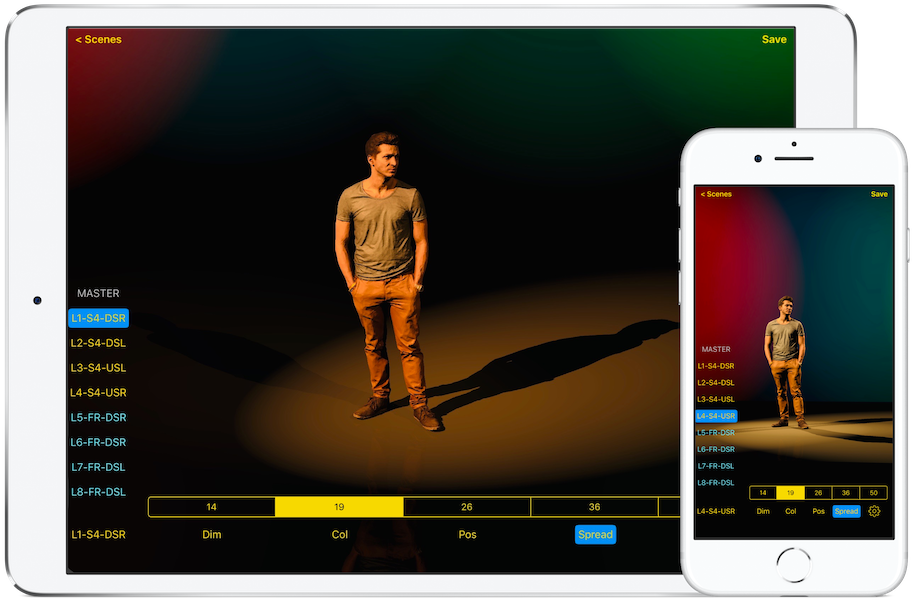
The workhorse fixtures in all theaters are ellipsoidal reflector spots and fresnels. We have picked two of the best from ETC. The venerable Source Four® is available with 14°, 19°, 26°, 36°, and 50° barrels to enable you to fill an acting area from anywhere in the theatre.
We also offer a Source Four® 7" Fresnel, which can zoom from a flood focus of 65° down to the spot focus of 20°. The shadow is much softer on this fixture just as it is in real life and varies with the zoom angle.
There are 8 fully adjustable lighting positions that can have either type of light assigned to it. So if you only want wash lights to work with, then all 8 positions can be fitted with the 7" Fresnels.
Choose your Colors
After you have selected your favorite colors and made up your color palette, you can use a color in that collection to assign the color to any or all of the lights.
Optionally, bring colors in from our award winning app Gel Swatch Library.

Hang Lights With 1 Finger, and no ladder.
Each light can be put anywhere inside 80' wide x 40' high x 80' long space. Lights assigned to the actor are focused automatically on the actor, making it easy for you to find the perfect angle.
Lights assigned to the backdrop can be focused anywhere on it by just tapping the cyc where you want the light focused.
Wash The Entire Stage, Or Not.
Each Source Four® can have different lens barrels so any light can be set to cover as much or as little area as desired. Lens barrels included are 14°, 19°, 26°, 36°, and 50°. The intensity of the light varies inversely with the beam angle and all the barrels show the proper light distribution and intensity.
Source Four® Fresnels zoom from 65° down to the spot focus of 20° to vary the light distribution and ShadowMagic shows the correct brightness of all settings. The shadow of a fresnel is softer and also varies correctly with the beam angle.
Let the Actors hit their marks, anywhere
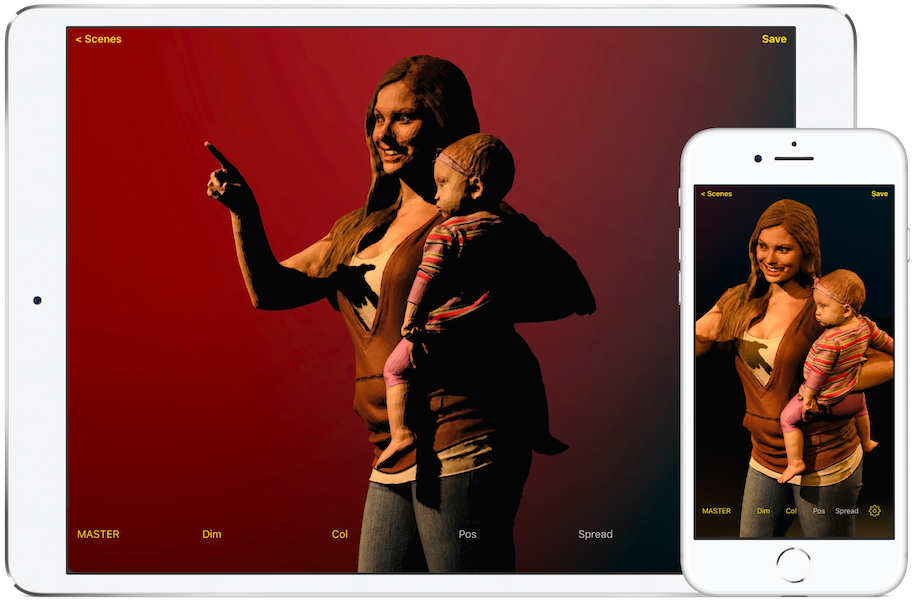
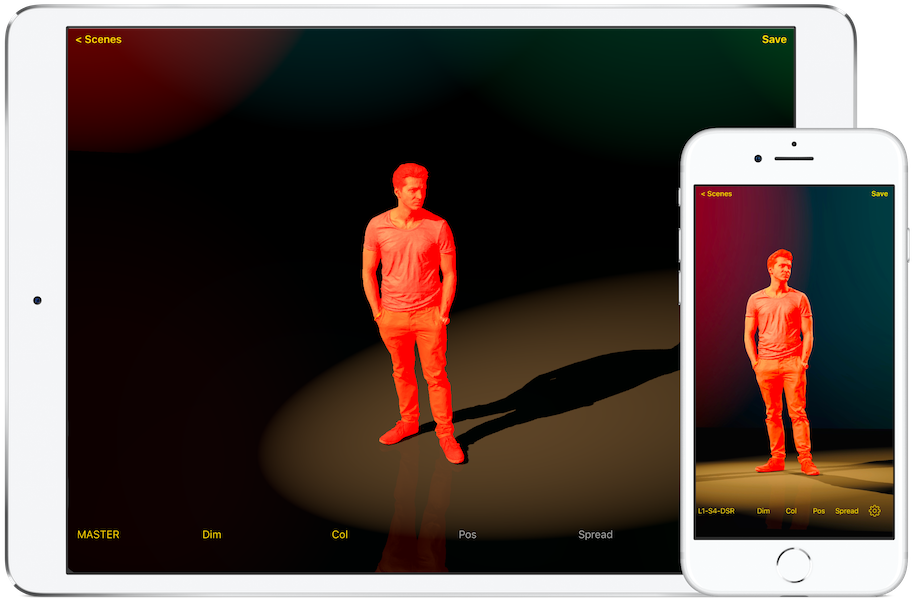
Now you can place the actor anywhere on stage. Also, face them where you please.
- Long press on the actor to select movement. (Actor turns red)
- 1 finger swipe up, down, left, right: moves the actor around the stage.
- 2 fingers rotate to pirouette the actor.
- Double tap to return the actor to the default position.
- Long press anywhere to de-select the actor.
Select your Favorite Colors.
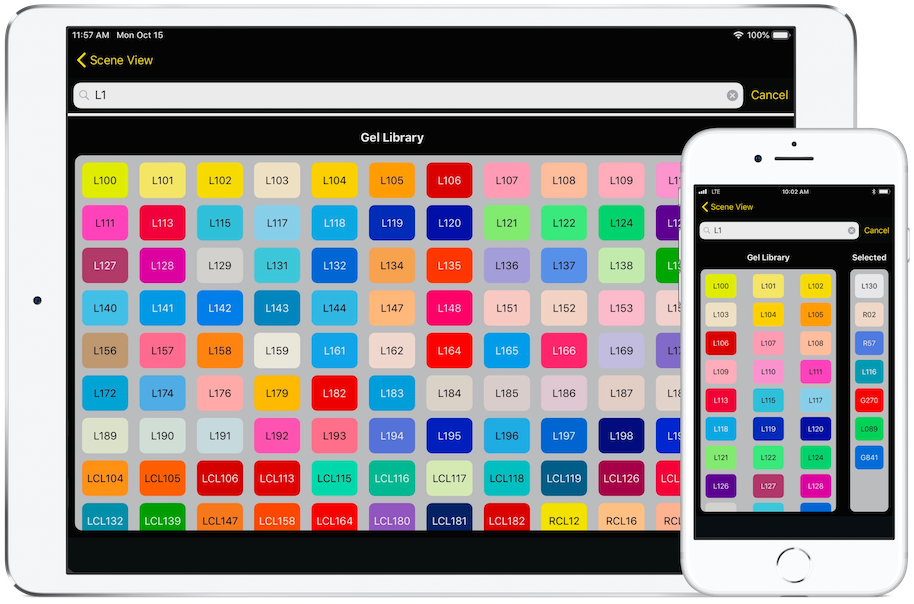
There are over 1,600 gels in the library from all the major manufacturers. Any of the colors can be dragged into the "Selected" column. If you don't want to use a particular color any more just drag it from the selected column back into the "Gel Library" field. Your selection of colors is made up into a palette up to any number of colors. Any color from your selection can be assigned to any light.
Or you can bring colors in from our award winning app Gel Swatch Library.
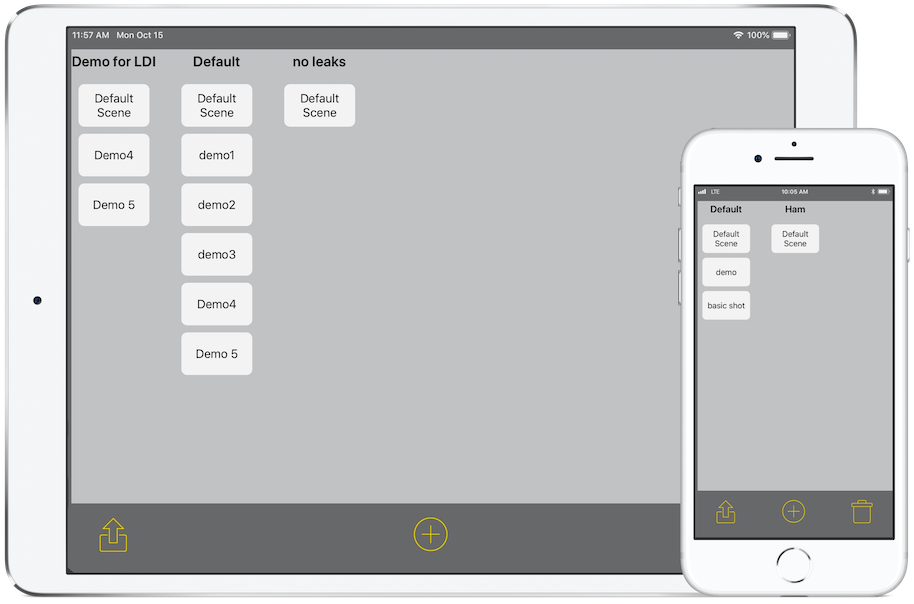
Save and organize your Scenes.
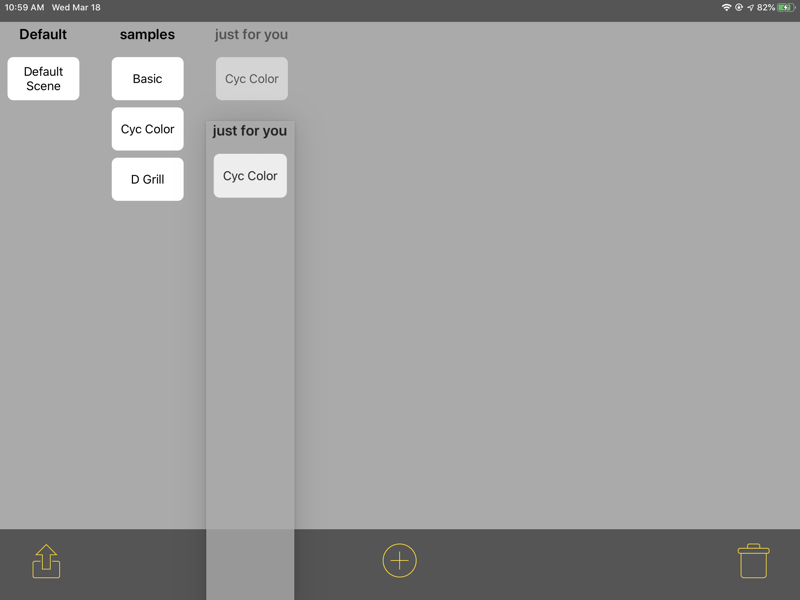
Every look can be saved as a scene. All the lights, all the dimmer and color settings, everything. Just hit "Save" after your are pleased with the look. The scenes can be organized by project and rearranged in any order you want. Any project can be dragged to the most convenient position. Any scene in a project can be dragged to a different order in the same project or copied to a new project, just drag and drop it where you want it.
Create a new project by tapping on the plus sign symbol. That will allow you to choose a project with just the default scene or the selection of prebuilt scenes we have available. Enter a name for a project and then create it. When created, this becomes the current project. Any scenes you create are added to this current project.
Projects can be shared with colleagues in a file that can be shared by email or text message any other channel that you already have installed. Or you can share scenes or projects as a .pdf file.
Frequently Asked Questions for ShadowMagic.
Table of Contents
What are the basic dimensions of my stage and theatre?
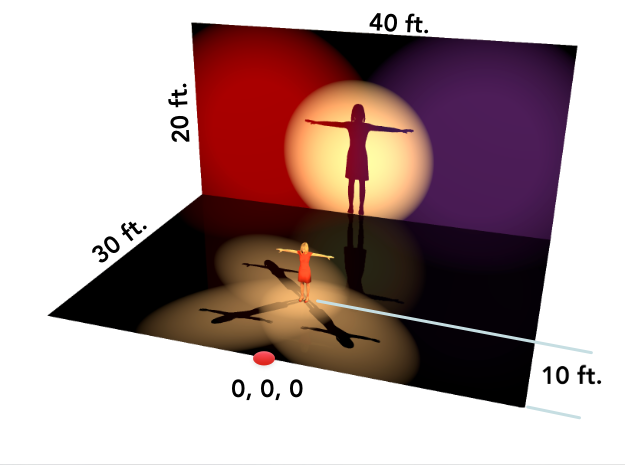
The picture above shows everything you should need. The deck is at 0 feet high, and down stage center is at the front edge of the stage. All the light positions are measured from here. Note that all distances from the downstage edge going upstage are negative, So placing a light at the cyc will be -30 feet upstage. Also notice that the lights are labeled upstage or downstage automatically for you. If the light label says USR, the light is upstage of the downstage edge of the stage and in this case, stage right of center.
A down light on the actor would be at "0 feet" Stage Left/Stage Right and "-10 feet" Up and Down Stage. A positive number for Down stage is over the audience and is a maximum of 50 feet. The lights can be positioned up to 40 feet off stage to either side and a maximum of 40 feet above the stage.
How do you navigate around the scene?
1 finger swipe up or down will tilt the scene.
1 finger swipe left or right will rotate the scene.
2 finger swipe will pan the scene up, down, left or right.
Pinch to zoom in or out of the scene.
A double tap to bring the scene back to the default viewing position.
And a 3 finger swipe vertically will dolly the camera in and out.
Where is the gel library?
From the main view tap the Gear icon and you will be taken to the settings page. Just tap "Select Gel Set" and you will go to the page where you can drag any color into the selected column. Selected colors may be reordered by dragging. If you want to de-select the color, just drag it to the Gel Library field. The search field is very helpful to narrow down the number of selections.
There is also a shortcut: Long Press on any color select button and be taken directly to the gel Library.
.png)
How do I create a project?
In the Projects page, tap on the Plus (+) Symbol and a window will pop up to allow you to name a project. You have a choice to create a project with just a basic scene in it or add in all the sample scenes that are available. This becomes the current project.
Can I edit the name of a Scene or Project?
Soon, but not at this time. You will have to create the name of the project you want, drag all the scenes into it and drag the project you don't want to the Trash.
How do I save a scene?
From the main view press "Save" in the upper left corner and a window to name the scene pops up. If you forget to choose save you will be asked if you want to save the scene or not. Or you can cancel and continue to work on the current scene.
How can I add a scene to another project?
Just drag the scene from one project to another. This will copy the scene. When you select a scene, its project becomes current.
Does ShadowMagic also run on an iPhone?
Yes it does. Anything that will run iOS 11, 12 or 13 is suitable to run ShadowMagic.
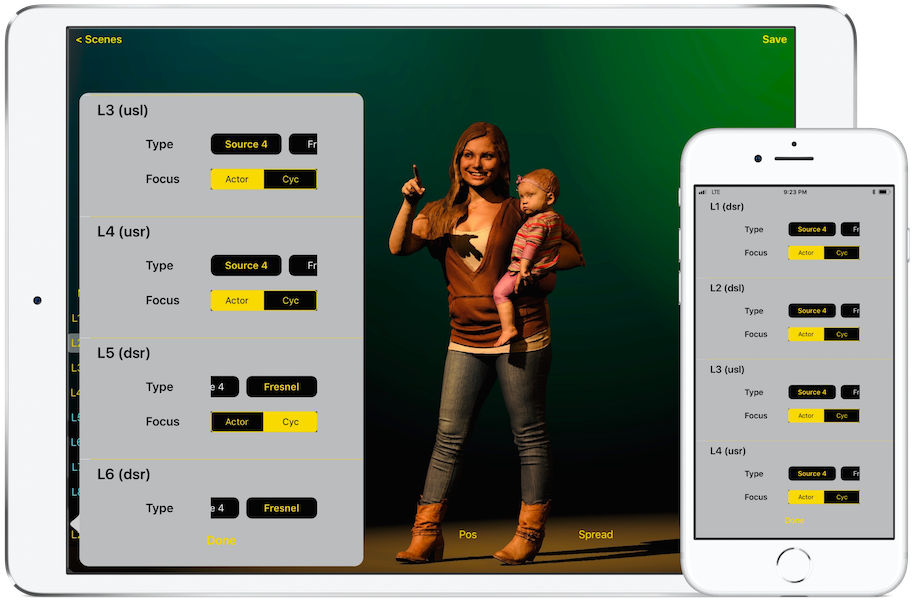
How do I assign a Fresnel to L1?
From the main view long press on any individual light (L1 - L8) and the light selection table will pop up. For L1 you will see a type box to choose Source 4 or Fresnel, and a focus assignment (Stage or Cyc}. Slide the type selector to choose a Fresnel. Choose the Fresnel and then tap done.
The light selection table can also be accessed from the setting page by tapping the gear icon and tap "Set Light Types".
.png)
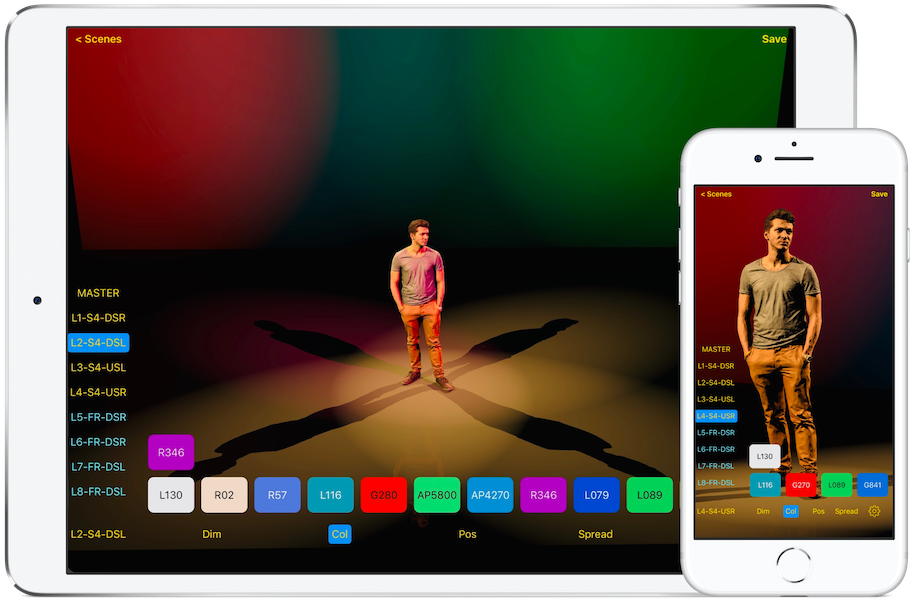
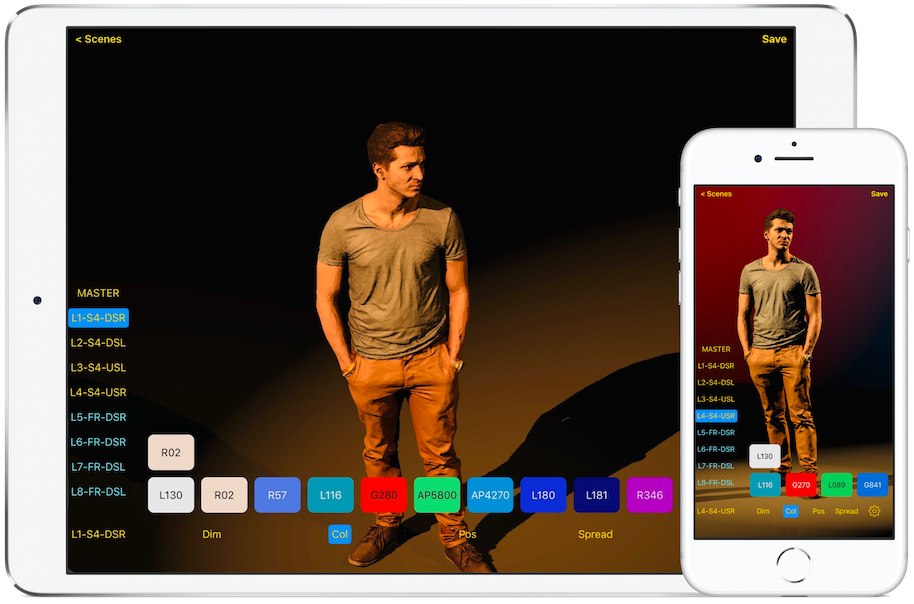
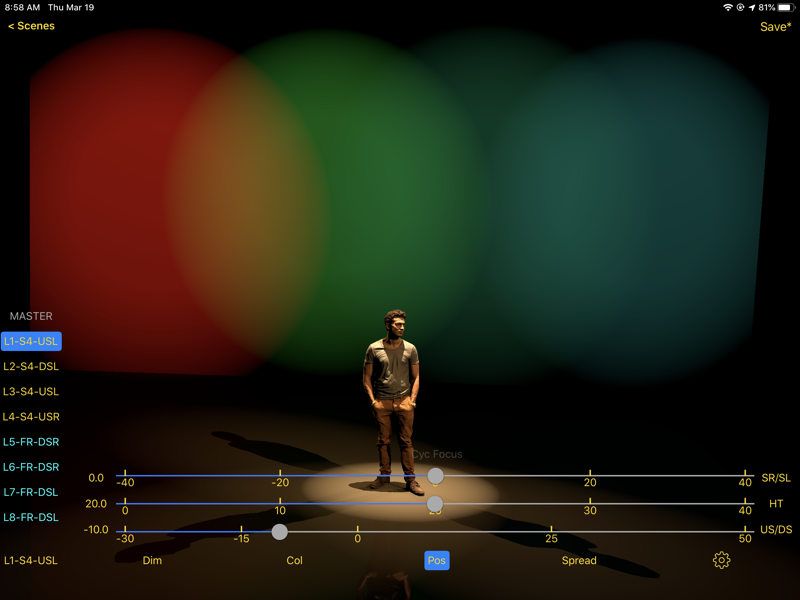
Why are the L1-L8 designators different colors?
The colors signify where the light is focused. Yellow is on the actor, and cyan is on the cyc.
The labels give you the following information: L1-8 is the lighting position. The second field is the light type and the final field is the position of the light. This changes as you move the lights around within the theatre.
.png)
How do I focus a light on the Cyc?
This video is also built in to the app and shows how to do this. The video can be turned on at the information page.
From the main view long press on any individual light (L1 - L8). The popup table has a "Focus" selector, pick Cyc. Hit done to go back to the main screen. With your recently changed cyc light selected, tap "Pos" (position). You will see a "Set Cyc Focus" button above the sliders. Tap that and then touch the cyc where you want the light to focus. If you are focusing a fresnel on the cyc, it is easier to see by setting the zoom to less than 45°.
What is the easiest way to set up a color palette?
Go to the Gel Settings page. Use the shortcut, long press on any color button, or go to the system settings page. Drag any color from the "Gel Library" window into the "Selected" Window. Multiple colors can be selected and dragged into "Selected". Just tap and drag your first and use another finger to tap on any visible color to add it to the flock of colors. Drop the colors into the "Selected" window.
.png) Search will help to narrow the choices available. Tap the search bar and type in the first letter of your favorite brand of gel. For instance: "R". That will give you all the colors of Rosco. If you then type a number e.g. R1, then you will see all the Rosco gels that start with 1. You should see R10, R11, R12 etc. You can do similar searches with Lee, GAM, and Apollo.
Search will help to narrow the choices available. Tap the search bar and type in the first letter of your favorite brand of gel. For instance: "R". That will give you all the colors of Rosco. If you then type a number e.g. R1, then you will see all the Rosco gels that start with 1. You should see R10, R11, R12 etc. You can do similar searches with Lee, GAM, and Apollo.
Search has been expanded so you can type in "red" and see all the gels with red in their name. Or "blue" or "green".
If you have our Gel Swatch Library app, you can set up the palette in GSL as a gelstring and import it into ShadowMagic.
How do I position the actor?
A long press on the actor will select him for positioning. The actor will turn red.
After positioning the actor, just long press anywhere on the stage to leave him at his marks.
How do I share a project?
A project which can contain one or more scenes can be easily shared using Messages or email. The following steps will show you how to use iMessage. To receive the shared project will take some setup of your iOS device which is laid out after the sharing. This only has to be done once and then sharing will be very easy.
Drag the project (not a scene!) onto the share icon in the bottom left (box with the up arrow) and you will be presented with a choice whether you want to create a report (.pdf) or export a project file. If you choose export project then you will be taken to a window of text that represents all the setting in your scene. Pick the share icon (lower right) and you can then share the file however is most convenient for you.
- Drag the project by grabbing the header
- All the way down to the share symbol
.png)
- Choose Export Project
.png)
- Tap the sharing symbol on the lower right
.png)
- Tap the Messages icon
.png)
- Send it to a colleague
.png)
How do I receive a project via Messages?
A project which can contain one or more scenes can be easily shared using Messages. The following steps will show you how to use iMessage. To receive the shared project will take some setup of your iOS device. This only has to be done once and then sharing will be very easy.
- Touch the account icon to get the Audio, FaceTime and Info icons. Touch Info
.png)
- Select the attachment
.png)
- Now touch the share icon in the upper right corner
.png)
- Tap the "Copy to ShadowMagic" icon
.png)
- You will be asked to import the file to ShadowMagic
.png)
- And it is added to your project sheet
.png)
Upon receiving a message with a project attachment:
Here is the one time set up where you tell Messages that ShadowMagic can process project files. In the future, ShadowMagic will automatically be an option for the attachment.
This brings up sharing options. Scroll right and select ...More
Set up Only
.png)
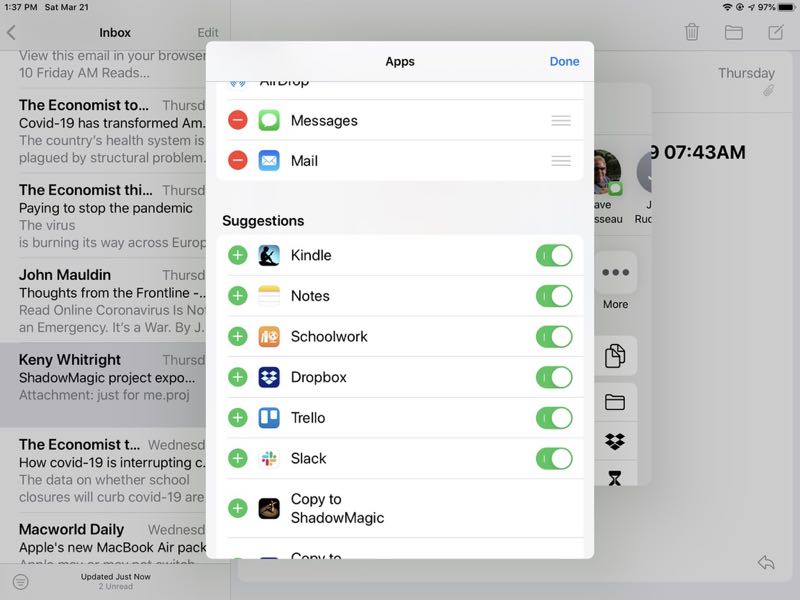
Under Suggestions you see "Copy to ShadowMagic", select Edit in the top right corner
Set up Only
.png)
Press the "+" button next to the ShadowMagic icon
Set up Only
.png)
This adds it to favorites, Press Done
Set up Only
.png)
Now (and for future imports) the "Copy to ShadowMagic" option is available on the share screen.
How do I receive a project via eMail?
A project which can contain one or more scenes can be easily shared using email. The following steps will show you how to use eMail. To receive the shared project will take some setup of your iOS device. This only has to be done once and then sharing will be very easy.
- Touch the attachment which will then bring up the share sheet
.jpeg)
- Tap the "Copy to ShadowMagic" icon
.jpeg)
- You will be asked to import the file to ShadowMagic
- And it is added to your project sheet
.jpeg)
Upon receiving an eMail with a project attachment:
Here is the one time set up where you tell eMail that ShadowMagic can process project files. In the future, ShadowMagic will automatically be an option for the attachment.
This brings up sharing options. Scroll right and select ...More
Set up Only
.jpeg)
Under Suggestions you see "Copy to ShadowMagic", select Edit in the top right corner
Set up Only
.jpeg)
Press the "+" button next to the ShadowMagic icon
Set up Only
This adds it to favorites, Press Done
Set up Only
.jpeg)
Now (and for future imports) the "Copy to ShadowMagic" option is available on the share screen.
Download the app now.
Lighting designers, photographers and videographers will be able to quickly and accurately visualize or plan any lighting project.